
Does threading your sewing machine often leave you squinting, fumbling, or on the verge of giving up? An easier threading process means less frustration and more time crafting. Threading a sewing machine correctly makes even and secure stitches that are free of snarls or skipped sections. With these tips for threading your sewing machine easily, you’ll save time and sew with confidence.
Tips Before Starting
For the best results, consult your sewing machine’s manual for threading instructions. The manual provides detailed diagrams and guidance specific to your model. Most manuals can be found in the original packaging or online on the manufacturer’s website.
Always select high-quality thread known for reliable strength and minimal lint buildup. Choose thread that is compatible with the fabric you will sew. The right thread will prevent stitch issues, ensure a neat finish, and extend the life of your work.
Wind the Bobbin
A bobbin is the part of the sewing machine that holds the bottom thread that works with the top thread to form each stitch. Winding it loads the thread so it’s ready to be placed in the bobbin case. To wind the bobbin, first place the spool of thread onto the spool pin located on the machine’s top. Position the thread spool so the thread unwinds counterclockwise.
Thread and Secure the Bobbin
Next, pull the thread out and wrap it around the bobbin winding tension disc, which is located above the needle. Take the end of the thread and insert it through one of the bobbin’s holes. Then, wrap the thread around the bobbin a few times.
Place the bobbin on the bobbin pin, found near the spool pin. Slide the pin over to the right to lock it into place. Press down on the foot pedal or the bobbin winding button to wind the bobbin. After a few turns, pause to trim any extra thread sticking out of the bobbin hole.
Complete and Remove the Bobbin
Continue winding the bobbin until it’s full. Many machines stop automatically when the bobbin is full, but if yours doesn’t, stop when the thread is level with the bobbin’s edges. Finally, slide the bobbin pin back to the left, remove the bobbin, and snip the thread, leaving two to three inches of excess thread.\

Threading the Upper Half of the Machine
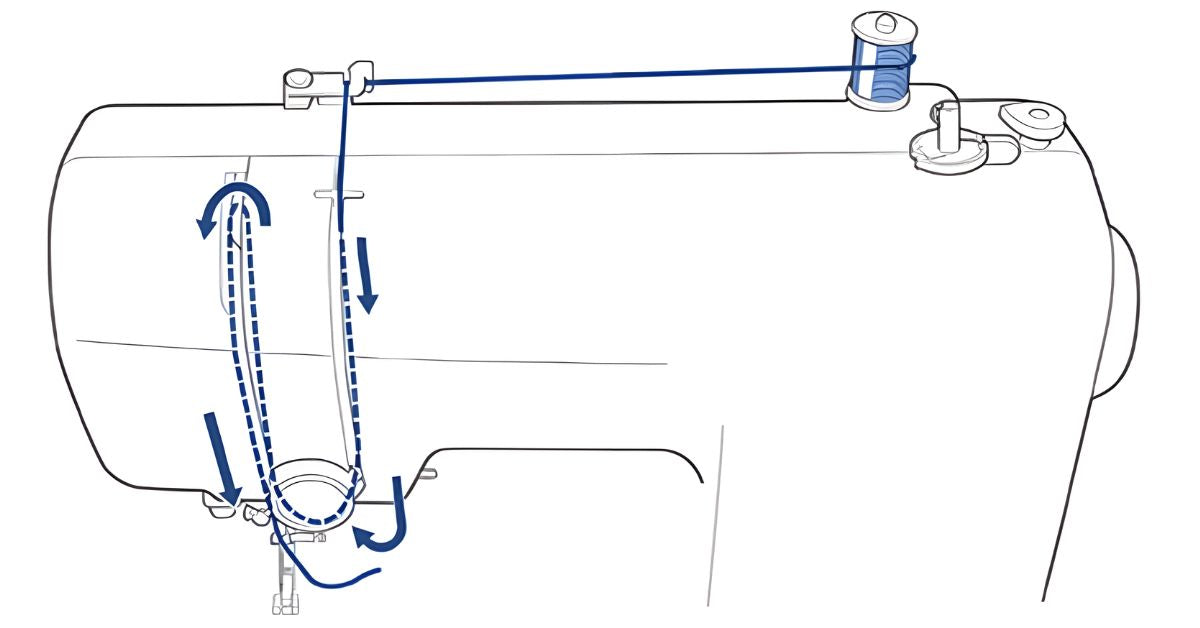
To start threading the upper half of your sewing machine, place the thread spool onto the spool pin. This pin is the larger of the two pins on the right side of the machine. The thread should unwind smoothly from the spool. Then, guide the thread from the spool across the top of the machine to the protruding thread guide. Pull the thread through the thread guide from back to front.
Next, pull the thread down through the thread guide. Loop the thread around the tension discs, then bring it back up through the second thread guide. At this point, your thread should create a U-shape.
Finish at the Needle
At the top of the second thread guide is the take-up lever, which has an eyelet. Pass the thread through the eyelet and guide the thread down to the needle. As you pull the thread through this path, it should not snag.
The thread should form an S-shape that starts at the thread guide, goes down around the tension discs, up to the take-up lever, and back down to the needle. Finally, pass the thread through the eye of the needle from the front to the back. The upper part of your sewing machine is now threaded.
Threading the Machine’s Lower Half
Start by opening the compartment that holds the bobbin case. It should open easily with a light pull or slide. On some machines, you may need to remove an additional small cover inside to access the bobbin slot.
Place the Bobbin
Next, unwind a few inches of thread from the bobbin. Then check the diagram on the bobbin compartment to see the direction the thread needs to go. Place the bobbin into the bobbin case based on the diagram’s instructions. Once the bobbin is in place, close the compartment and replace the covers you previously removed. The bobbin thread will be under the plate below the needle.
Bring the Thread Into View
Finally, bring the bobbin thread into view. To do this, turn the handwheel on the right side of the machine toward you a few times. This motion will pull the bobbin thread up through the plate under the needle.
If the thread doesn’t come up, confirm the bobbin is positioned correctly and that the thread flows without resistance. If the thread doesn’t move smoothly when you pull it, the bobbin may be too full, and you may need to unwind some of the thread. Once the thread is up, pull the bobbin thread and top thread to the side of the machine. And with that, you’re ready to start sewing!
Test and Adjust Stitches
Before starting your project, use a scrap piece of fabric to test the stitches and tension. Gently hold the threads at the back to avoid tangles as you begin sewing. Lower the presser foot to stabilize the fabric and engage the feeder.
If the stitches don’t look right, you can follow these steps to correct them:
- Check that the machine is threaded correctly, including the bobbin and upper thread path.
- Adjust the tension settings on the machine, starting with small changes to find the correct balance.
- Inspect the needle to ensure it’s not bent, dull, or improperly inserted. Replace it if needed.
- Verify that the fabric is aligned and that the presser foot is lowered securely.
- Ensure the bobbin is wound evenly and placed correctly in its case.
- Clean the machine by removing any lint or debris that could block the thread or affect stitch quality.
- Re-test on the scrap fabric and make additional fine-tuned adjustments as necessary.
We hope that this step-by-step guide makes it easier for you to thread your sewing machine. Correct threading ensures smooth stitches, avoids unnecessary frustration, and allows you to focus on creating beautiful projects. If you’re looking to refine your skills or learn new techniques, we welcome you to join our sewing classes in Fresno, California. Whatever your level of sewing experience, we provide expert guidance and a fun, hands-on learning experience. Sign up today to meet fellow enthusiasts and follow your passion.